 |
| Folk Art Dolls are Easy Hand Sewing |
How to Make Sock Dolls Country Folk Art Fabric Crafts
You don't need a sewing machine to make sock dolls for gifts or for decorations -- you don't even need a pattern. Most of the sewing on a sock doll is best done by hand. These folk art dolls are fun and safe for small children. They bring a smile to the maker as well as the child, and you can add expressions with embroidery or fabric pen.
We used some old socks, quilting thread (it's stronger than regular thread), embroidery thread, a tapestry needle to make sock dolls for the two new babies in our family. We stuffed the dolls with cotton quilt batting so the babies won't be able to get hurt on the interior in case they get them apart.
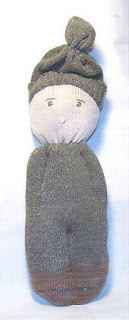
You need two socks to make a sock baby that has a light-colored face and dark-colored body. Cut the toe off the light-colored sock about 4 inches up. Run a gathering thread with a running stitch and quilting thread around the cut area, but leave it open. Stuff the opening with cotton or whatever you have available that is safe for a child. Some children are allergic to Fiberfill. Stuff the sock so the cheeks are cheeky and the head is smaller at the top than the cheeks. Pull the thread to gather the head.
 |
| Handmade Sock Doll |
Cut the dark sock straight across at the heel. Hand stitch with a backstitch from the bottom up in the center to make legs. Sew a running stitch around the top for the neckline. Stuff each side of the legs and the body. Pull the thread to gather the neck.
Match the size of the neck and the bottom of the head with gathers. Stitch by hand to join the head to the body.
Backstitch from the neck part of the way down to form an arm on each side.
Stitch eyes and a mouth with embroidery thread to give the little guys some personality. Use the top of the dark sock for a hat. Sew across the top or gather it on the wrong side and turn right side out. Stitch the hat to the head to keep it from getting lost.
 |
| Another Style of Sock Doll Completely Hand Sewn |
Another Style Sock Doll
A single white sock can make a small doll. Imagine the sock heel as the doll's behind. Turn the sock wrong-side out and stitch a soft curve for feet. Cut the center piece between the feet to use for arms. Make arms in a closed tube shape and stitch around the edge. Turn the stitching to the inside and set the arms aside.
Turn the sock back to the right side and stuff to a couple of inches above the heel. Use a running stitch with quilting thread to make a gathering line for the neck. Pull it tight and use a strand of dental floss on the outside, knotted and ends cut short, to hold it tight. Stuff the head with more cotton or stuffing.
Leave about 1 1/2 inches of sock at the top. Use quilting thread and a running stitch in another line around the top of the head for gathers to close the top of the head. Tie the gathers with dental floss and turn the top down to create a hat.
Place a small amount of filler in the arms. Turn the fabric edge inside and stitch the arms to suitable spots on each side of the body of the doll.
Embroider eyes and lips. Your little sock doll is light-weight and easy for a small child to handle.
We hope you enjoy a wonderful holiday season and that your new year holds pleasant surprises and lots of crafting.
See you soon!
Linda