Thursday, December 22, 2011

Hand Sewing Sock Doll Folk Art Crafts Instructions

sock dolls handsewn folk art recycle crafting
Folk Art Dolls are Easy Hand Sewing

How to Make Sock Dolls Country Folk Art Fabric Crafts


You don't need a sewing machine to make sock dolls for gifts or for decorations -- you don't even need a pattern. Most of the sewing on a sock doll is best done by hand. These folk art dolls are fun and safe for small children. They bring a smile to the maker as well as the child, and you can add expressions with embroidery or fabric pen.

We used some old socks, quilting thread (it's stronger than regular thread), embroidery thread, a tapestry needle to make sock dolls for the two new babies in our family. We stuffed the dolls with cotton quilt batting so the babies won't be able to get hurt on the interior in case they get them apart.

You need two socks to make a sock baby that has a light-colored face and dark-colored body. Cut the toe off the light-colored sock about 4 inches up. Run a gathering thread with a running stitch and quilting thread around the cut area, but leave it open. Stuff the opening with cotton or whatever you have available that is safe for a child. Some children are allergic to Fiberfill. Stuff the sock so the cheeks are cheeky and the head is smaller at the top than the cheeks. Pull the thread to gather the head.
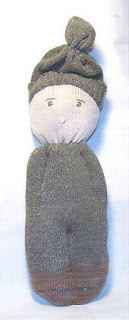
folk art sock doll embroidered eyes winter hat
Handmade Sock Doll


Cut the dark sock straight across at the heel. Hand stitch with a backstitch from the bottom up in the center to make legs. Sew a running stitch around the top for the neckline. Stuff each side of the legs and the body. Pull the thread to gather the neck.

Match the size of the neck and the bottom of the head with gathers. Stitch by hand to join the head to the body.

Backstitch from the neck part of the way down to form an arm on each side.

Stitch eyes and a mouth with embroidery thread to give the little guys some personality. Use the top of the dark sock for a hat. Sew across the top or gather it on the wrong side and turn right side out. Stitch the hat to the head to keep it from getting lost.

single sock makes folk art handmade doll
Another Style of Sock Doll Completely Hand Sewn

Another Style Sock Doll


A single white sock can make a small doll. Imagine the sock heel as the doll's behind. Turn the sock wrong-side out and stitch a soft curve for feet. Cut the center piece between the feet to use for arms. Make arms in a closed tube shape and stitch around the edge. Turn the stitching to the inside and set the arms aside.

Turn the sock back to the right side and stuff to a couple of inches above the heel. Use a running stitch with quilting thread to make a gathering line for the neck. Pull it tight and use a strand of dental floss on the outside, knotted and ends cut short, to hold it tight. Stuff the head with more cotton or stuffing.

Leave about 1 1/2 inches of sock at the top. Use quilting thread and a running stitch in another line around the top of the head for gathers to close the top of the head. Tie the gathers with dental floss and turn the top down to create a hat.

Place a small amount of filler in the arms. Turn the fabric edge inside and stitch the arms to suitable spots on each side of the body of the doll.

Embroider eyes and lips. Your little sock doll is light-weight and easy for a small child to handle.

We hope you enjoy a wonderful holiday season and that your new year holds pleasant surprises and lots of crafting.

See you soon!

Linda

Sunday, November 13, 2011

Christmas Fabric Crafts are for Gifts, Too

embroidery on burgundy velvet fabric
Embroidery on Unusual Fabrics
Christmas Fabric Crafts are for Gifts, Too

If you aren't deep in the mire of Christmas crafts, you are losing valuable time. Crafts are personal gifts and although you think it's easy, crafting is not easy for those with no interest, desire or talent. This may describe your relatives or friends that you buy for each year. This year, save some money and spend the time it takes to make something personal.

Choose colors you know the person likes. Whatever your project, favorite colors matter. Use colors in the home for a project for the house, or favorite colors for a personal item. Starting with favorite colors makes the item special to that person.

Choose a design that speaks to her (or him). If you give a gift, you know enough about the person to express her style. You know the kind of dog she has, her favorite flower, or her favorite season.

Make something usable. Whether displayed in the home or a personal item, make a usable item. A fleece throw in an appropriate color for the individual or house, decorated by you with embroidery of a favorite animal is an example of something your friend or relative should appreciate as a Christmas gift.

Fleece is reasonably priced and easy to work with. You don't have to do much sewing as it doesn't fray, and the blanket or buttonhole stitch is suitable for finishing the edge. Remember how to do blanket stitch?

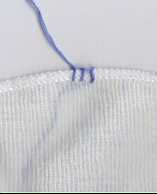
Here's a picture.

blanket stitch buttonhole stitch embroidery
Blanket Stitch Looks Good on Fleece


You can use yarn, ribbon or embroidery thread for the blanket or buttonhole stitch on fleece. Once you have the binding around the edge, embroider a design in a corner -- an initial monogram or something that shows you made the gift especially for the person. You'll be one gift ahead, and you didn't even have to fight the crowd to shop!

See you soon!

Linda

Thursday, October 13, 2011

Fleece or Felt for Crafts Projects -- Think Christmas

fabric crafts felt fleece angel
Felt Makes Crisp Cutouts

Felt or Fleece?

Fleece has taken the crafts market by storm, but felt is an old standby. If you like crafts that do not require much sewing, felt and fleece are ideal because they do not fray. However, fleece does not produce the same result as felt. The feel of fleece is an improvement over the feel of felt, but felt has been around for years and works well for crafting.

Why use felt when fleece feels best? The answer is in the crispness of the fabric and the way it is made. Fleece has a center layer of foam and when cut, the edges are not crisp. Using a crafts project made with fleece creates more fraying or feathering of the fleece fabric. Fleece is heat sensitive because of the foam center in the fabric. Use care if you attempt to press fleece. Felt holds up better for small crafts.

Fleece is a good fabric for large projects such as scarves or even baby throws, but is not as good for, say, making a snowman applique for a Christmas stocking. We have some fleece books and patterns available on a selling site if you need ideas. Copy and paste this link to get to the fleece items.

http://www.ioffer.com/selling/cajunc?query=fleece

Felt has been available for many years and there are some excellent patterns. Felt patterns are available for sale as well, but you will need to copy and paste the link.

http://www.ioffer.com/selling/cajunc?query=felt

Fleece does not work well for applique work with layers of fabric as it tends to get thick with just two layers. Sometimes you can use fleece best with cut-out designs.

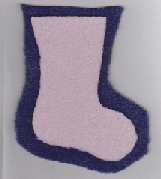
Here’s how to make cut fleece designs. Make your background shape with fleece first. Cut a second shape slightly smaller than the background with a contrasting color of fleece.

cut two shapes one larger fleece fabric
Cut Two Fleece Shapes


Cut out designs in the second shape before you stitch the two pieces together.

fleece cut out crafts Christmas stocking
Cut the Design on the Top Layer

Fleece is fun and easy to work with, and you just need to design the work to accommodate the fabric capabilities. Cut-outs are one of the ways to use fleece for your Christmas projects this year.

See you next time with more needlework crafts!

Linda
cajunC

Tuesday, September 13, 2011

Candlewicking Embroidery Stitches You Can Make

French Knots and Satin Stitch
Candlewick Embroidery Stitches


Candlewicking is an old needlework craft that takes only a little ability and a few stitches to make something splendid. Candlewicking is returning to the needlework scene and is an embroidery you can use on many items. It is mostly French knots made with ecru cotton candlewicking thread. Satin stitch and chain stitches add texture and emphasis to candlewicking projects.


French Knot

Bring the threaded needle up through the fabric. Twist the thread around the needle three times and put the needle back down into the fabric close to where you brought it up, placing your thumb on the twisted thread as you pull the thread through to the back. Move to the next French knot and repeat the process.

Satin Stitch

Satin stitch is a long stitch that fits the space you want to cover. This stitch works well for smooth leaves or specific shapes. Make the stitches close side by side. You can see some satin stitches in the gold pillow surface here. You can make a padded satin stitch by creating a row of long stitches going in the opposite direction before you start the top row of stitches.

This Pillow Uses Chain Stitch for Edging Shapes


Chain Stitch

The chain stitch is ideal for outlining and is used for the green butterfly in the picture. Here's how to make the chain. Pull the thread through to the top and put the needle back down and up in a small stitch like a lazy daisy. Loop the thread around the needle, and pull the needle through the fabric. Move forward a few threads and place the needle into the fabric and bring it up about the same distance away as the first stitch. Don't pull the needle all the way through until you loop the thread around again.

Chain Stitch You Can Do

Needlework crafts are relaxing and beautiful. Enjoy candlewicking and embroidery crafts this summer while it is still too hot to work in heavier crafts like making afghans or quilts.


Do you like frugal living? We have a new book entitled "Retirement Living Guide for Senior Citizens." If you are interested in frugal or green living and preparing for your retirement, you can read part of the book without an ereader at no cost.

http://www.smashwords.com/books/view/77302

Have a great week!

Linda
cajunC

Wednesday, August 31, 2011

Sew a Poodle Skirt Circular Felt

Crafts - Make a Felt Poodle Skirt with Little Sewing

Create A Personality Poodle from Felt and Cotton Balls


Make a felt poodle circular skirt for a 50s party or for a Halloween costume with some basic sewing and a cotton ball poodle you make yourself.

A poodle skirt is usually circular, and felt comes in 36 or 72 inch width. Measure from the waist to the length you want the skirt to be and add an inch. That tells you how large the arc for the circle will be before you calculate the waist measurement.

36-Inch Wide Felt

If you use 36 inch fabric, you will need four yards or about 144 inches for most sizes, but you may need more for a large-waisted tall person. Double the fabric to make it 72 inches by 36 inches. You will need to plan the pattern from the selvage edge and add a seam on each side to make the complete circle. A skirt about 30 inches long will take the entire piece of fabric, with just enough for a waistband.

Make an arc with a string tied to a pencil. Once the string is tied, measure for the correct length for the skirt and add 1/4 of the waist measurement. A 24-inch waist would be 6 inches added to the string. A 28 inch waist would add 7 inches and 32 inch waist adds 8 inches. Cut the string to the correct length, such as 30 inches plus 6 inches (24 inch waist) would be 36 inches long, 27 plus 7 inches for 34 inches, depending on the height and waist of the person who wears the skirt. If you are making the skirt for someone heavier or taller, you may need to piece the skirt at the bottom, and you will need more fabric than the 4 yards of 36 inch felt or 2 yards of 72 inch felt.

Mark the middle of the fabric. This is at the 36-inch point down the side. Pin the string at the midpoint and pull it tight. Strike the arc with the pencil and mark on the felt for the cutting line for a quarter circle. Using 1/4 of the waist measurement, go back to the midpoint and draw an arc that is 6, 7, or 8 inches from the starting point. This makes the cutout for the waist.

Cut out your skirt once you are confident that you have the correct measurements.

Pattern for Circular Skirt


Cut a 5 inch strip of felt that is the waist size plus 2 1/2 inches. If you don't have a 5-inch wide strip, cut two strips that are 3 inches wide by the waist size plus 2 1/2 inches and sew them together.

Stitch the two semi-circles together, leaving a placket on one side. Add the waistband by pinning right sides together, leaving at least half an inch of the waistband extended beyond the backside of the placket. The placket will be on the left side when worn. You will have about 1 1/2 inches of the waistband extended for hooks and eyes or a buttonhole. Stitch the waistband in place with about 1/2 inch seam. Press the seam inside and fold about 1/2 inch of the raw seam to the inside. Stitch both ends and turn. Stitch the waistband on the backside by hand or by machine.

There is no hem required as the felt will not fray.


72-Inch Wide Felt

Fabric that is 72 inches wide will require at least 2 yards or 72 inches. The 72-inch fabric is already doubled to 36 inches wide by 72 inches long. The fold is down the side. You will need to mark the mid-point that is the starting point for the measurements. This will be 36 inches down the folded side of the fabric. Measure as explained above to make the arcs for the skirt pattern. You need one arc for the bottom edge of the skirt and one for the waist.

Follow instructions above for the completion of the skirt.

Funny Poodle on Felt Circular Skirt

Make a Cotton Ball Poodle for the Skirt

Cut the basic poodle shape from felt. You can use a 12 inch x 12 inch felt square of white or gray. Remember that your placket is on the left side of the skirt and you probably want the poodle in the middle of the front. Pin it in place. You can stitch around the edge or glue it with a fabric glue. Don't use ordinary glue or it will leak through and be stiff. Sew a rhinestone button on for the eye, or you may be able to pin it with a safety pin. Glue cotton balls on the body of the poodle and add a ribbon bow to the tail.

Here's all you need for a poodle shape. Make it the size you want to show well on the skirt.

Make a Poodle Shape to Cut and Decorate

Sewing crafts is more fun than making clothes to wear, and Halloween and play costumes don't have to be perfect. They may only be worn once or twice. Make a doll poodle skirt if you have some felt left over.

This Poodle Won't Like a Bath

See you soon!

Linda


Friday, August 19, 2011

Use Quilted Placemats for Simple Sewing Projects, Bags and Apron


 Use Quilted Placemats for Simple Sewing Projects


Quilted fabric is expensive. Sometimes I find quilted placemats work better than the purchase of fabric, and the placemats are often available at thrift stores for just a couple of dollars. The next time you need some quilted fabric to sew, consider whether placemats will work. They already have finished edges and may be just the size you need. Here's a good placemat fabric for an apron, but be aware that the design only goes one way.

Quilted Placemats

Here are some quilted placemat project ideas. Start by washing your placemats and drying them in the dryer so they are preshrunk.

If you want a large bookbag or purse, use two full-size rectangular placemats back to back. Start with some coordinating handle fabric (webbing will work, too) and make two handles about 25 inches long. Attach each side of the handle to the inside long edge of the placemat, about 6 inches apart. Sew the placemats together along the other three sides, with extra stitching at the corners. Because the placemats are already "finished" on the edges, you can sew them on the outside.


Make a child's apron with a single placemat and some coordinating fabric for ties. An octagonal placemat works best, but you can make a rectangular placemat into an octagon by folding the corners diagonally.

Visualize the child's apron as the placemat from the short end. Add ties at the top to tie around the neck and another set of ties where you want the waist to be. Fold the bottom up about 4 inches and stitch at the sides. Make pockets by dividing the area into three or four sections.

Here's a good placemat for a child's apron:

Good Placemat for a Child's Apron

There are fancy placemats out there that are great finds for special bags. This placemat makes an elegant clutch:

Elegant Clutch Placemat


Make a clutch bag with a single rectangular placemat by dividing it in thirds and stitching the sides closed. The top third is the flap. You can add a snap or Velcro closure. You can make a jewelry clutch, a shoulder bag purse, a holder for your crochet or knitting needles and many children's items from a set of placemats. Look for placemats when you go thrift shopping. You don't need a set of four for sewing projects.

Have fun with a cool project for hot weather.

White wing doves are at the fountain in our backyard. It's still 100 degrees and no rain in central Texas. See you soon!

Doves at the Fountain


Saturday, July 30, 2011

Patriotic Quilt Blocks Red White Blue Fabric Crafts You Can Make

 Patriotic Quilt Blocks Red White Blue Fabric Crafts


In 1976, a patriotic quilt pattern was published with a block for each of the 50 states, and many "state" quilts have been made based on those blocks. The original blocks came from "Hearth and Home" Magazine from 1907 to 1912. These patterns are interesting, but some are difficult -- for example, the Texas star is in a circle. This book is called "The United States Patchwork Pattern Book" and I believe it is still available. I have the 1976 version.

Even if you don't have this old pattern or the skill to make the squares as designed, you can make a patriotic quilt with blocks in designs you like. To make it easier, make certain that the blocks are all the same size or add stripping to the blocks to make them all the same size.

I decided to try my luck with red and blue on a white background for blocks to assemble for a wall hanging or maybe a lap quilt. These are 8 inch size blocks. I started with a flag pattern. The flags are about 5 1/2 inches square and the strips for the flag stripes were about 1 1/4 inches. The squares are a little smaller than the pinwheel, so I may have to put a strip around the edge. Here's what I came up with:

Flag Block for Patriotic Quilt

Then I made a pinwheel in red and blue on white. The pinwheel squares are 4 inches and the triangles are about 2 by 3 1/2 inches.

Pinwheel Design in Red and Blue

The final design uses 3 inch squares and came out to the 8 inch size that will be 7 1/2 inches square when an outer edge is added. I started with 5 strips in alternating red and white, one inch wide. I stitched these so they are 5/8 inch wide, so the seams are about 3/16 inch. That's the center square.

The pennant squares have red pieces that are half of the square, or 1 and 5/8 inch by 3. The other part that is 1 5/8 inches by 3 is made of one white triangle and two blue ones. You need four of these triangle squares and 4 plain white squares. Assemble the three dark squares across first, then assemble the two whites and the triangle square for each side. Before you put them together, press and pin at each seam edge to make certain they fit. Restitch if necessary. I got the hang of it by the second one, but this is more detailed than you have to make and it is a little tedious.

Pennant Square


If you are tired or don't like making these patriotic quilt blocks at this point, make a pillow -- don't just give up. If you have two or four blocks, you can make a 16 inch pillow front. Put a red or blue strip between the blocks and add a blue block and a red block with no design if you only made two blocks. Add batting and backing and quilt if you want. Use your imagination.

We are still in the heat of summer in Texas, and quilting blocks are small and crisp to work with. I'm not crocheting afghans again until winter.

See you soon!

Linda

Saturday, July 16, 2011

Make a Pillow from a Shirt Recycle Fabric Crafts

 Easy Pillow from a Shirt, Recycle Fabric Crafts


Pillows add to the finished look in a living room or bedroom, and they are fun and easy to make. You can repurpose or recycle and make an easy pillow. You need no zipper when you use a shirt with buttons. You only need an old shirt, a pillow form or fabric and stuffing for an inner pillow, and a needle and thread to make this nifty recycled pillow.

Choose a shirt -- mens or womens. The larger shirts make larger pillows if you choose. Lay the shirt flat with the front side up and all buttons buttoned. Measure from underarm to underarm and see how large you can make a pillow. Pillows are usually square, and it takes a 17-inch square to make a 16-inch pillow. Use a 15-inch square for a 14-inch pillow and a 13-inch square for a 12-inch pillow. Pillow forms are available in 12 inch, 14 inch and 16 inch sizes, but you can make the pillow any size and fill it with loose filler, quilt batting or even old pantyhose if you choose.

If you use loose filler or pantyhose, make an interior liner of muslin or a solid-color fabric that is about the same size as the outer form. Sew around the liner, leaving about 10 inches open. Turn the liner right-side out and fill with stuffing. Close the opening with hand or sewing-machine stitches.

Back to the pillow: Mark the odd-size measurement (13, 15, 17 inch) on the fabric as high up under the arms as possible. Measure down the front to make a square in that size. Pin the front and back layers of the shirt together inside the square you have drawn on the front of the shirt.

Make Buttons Part of the Pillow


Cut through both layers to form the square. Use fabric or embellishments to decorate the right side or surface that was once the back of the shirt. Turn the right sides of both of the fabrics inside and sew around the outside edge, using a half-inch seam allowance. Unbutton the pillow top to turn the fabric. Fill your shirt pillow with a pillow form or the liner and stuffing of your choice. Button the buttons.

You can use the button-up side for the front or the back of the pillow. Use your own creative ideas for decorating one or both sides.

Friday, July 1, 2011

Zipper Flower Crafts Recycle Zippers


 Recycle Zippers into Flower Crafts

Sewing notions accumulate, and I have more zippers than I intend to use in this lifetime. Zippers are available at thrift stores or in the sewing box of anyone who sews. Zipper flowers have been floating around the crafts markets for a few years but I had not tried to craft them until this summer.

Zippers Are Flexible Enough to Make Circles


I sew all of these crafts, but gluing might work for you. I don't like the effect of the glue, or the permanence. I want to reuse the zipper pieces if I don't like the result.

You can use a zipper with plastic teeth or metal teeth. Use old or child's scissors to cut through a zipper. You don't need a sewing machine or any sewing ability to make these flowers. You need a needle and thread and an old zipper or two. Here are the stitches I used to make these examples:

Stitches for Zipper Flowers

A longer zipper makes a fuller flower. Cut the stop at the bottom if it bothers you. I left the stops on these samples. If you leave the stop on the zipper, unzip the zipper to the bottom before you start to sew. Thread a needle with quilting thread or something strong enough to gather. Start at one end and tack with a few stitches. Make a stitch like the zigzag about 3/4 of an inch apart. When you get to the zipper stop, you are in the middle of the zipper. Continue with the zigzag stitching to the end.

Pull gently on the thread to gather. Roll your flower from the end where you started sewing. Tack the end with a couple of stitches when you have the stitching pulled as tight as you want.

Zipper Flowers Can be Elegant

Experiment with other methods. The pink zipper flower is made by stitching the sides of a closed zipper with a straight stitch. The light gathering creates the circles for the three-petaled posy. The purple zipper is closed to start and the sides are whipstitched together at the back of the zipper teeth.

Stitch the Sides of the Zipper Closed


Use felt the same color as the zipper or white to cut a 50-cent size circle to sew the zipper flower in the shape you want. Add a safety pin to the back to make it removable or stitch it to a fabric purse, a sweatshirt or a wallhanging. Consider other uses for this recycled crafts project.

I've missed you guys! I've been working on a writing project that had to be completed by the end of June. So glad to get that done and back to fun!

Happy crafting!

Linda


Friday, April 29, 2011

Felt Flowers No Sew Needlework Crafts

 Felt Flowers No Sew Crafts


Hi Needleworkers!

I've been working on felt flowers made with just two colors or scraps of felt. There are five basic shapes to make the flower I show here, and no sewing! Here is the basic pattern:


Cut the approximate shapes for the felt flower. The petals are about 3 1/2 inches in diameter and the leaves are about 5 inches. The felt is standard weight, not the heavy stuff. The dog bone shape is 8 inches long. Once you have the pieces cut, cut an X in the center of each of the four smaller pieces, but not the dog bone.

Fold the dog bone in half. Slip a section of flower petals on the dog bone with the use of the X cut in the center. Add the next section. Add a leaf section. Add the next leaf section opposite the first one.

The Dog Bone Shape Makes the Center


Your felt flower is complete. You can use it on a package, or make more for a bouquet. This may work for fleece as well. I'll try some others and let you know!

Completed Felt Flower, No Sewing

These felt flowers are so easy to make, kids old enough to use scissors can learn how.

We're moving the blog, but you will still be able to follow it or read when you want. This will give it a new name -- myneedleworkcrafts.com.


Tuesday, March 8, 2011

Crochet Needlework Crafts Are for Adults and Children


 Crochet Needlework Crafts For Adults or Children


Crochet crafts are for everyone. Children can learn to crochet. Start with a large needle and yarn and a beginner book or pattern. You will be surprised at how well a child can crochet and follow the pattern with just a little help from Mom or Grandma. If you are a child at heart and never learned to crochet, now is a good time to try this old needlework craft that will never really grow old. Yarn crochet is easier for learning, but thread crochet has more intricate patterns for fine doilies and filet crochet. These are thread doilies:

Thread Doilies to Crochet
This is a yarn baby afghan. Crocheting a baby afghan takes much less time than an adult afghan. Just get a crochet hook in a large size and get started with a skein of yarn. If you like it, make a baby afghan for a gift. If you have tried making an afghan and had difficulty keeping it square, start with one size larger hook for the chain and first row, then go to the size hook recommended for the pattern.
Yarn Crochet is Faster and Easier
We have lots of inexpensive crochet books and crochet patterns available for sale and there are lots of other sellers online. You don't have to buy new to have fun with needlework.

See you soon! Spring has arrived in Texas! We love the birds and the backyard.   Linda


Monday, February 28, 2011

Make an Embroidery Bullion Rose for Crazy Quilting or Ribbon Embroidery

Bullion Rose
Hi Guys!  Are you working on a needlework project? If you like to embroider flowers, a bullion rose is one of the most interesting flowers you can make. This rose is made with embroidery floss but looks great with ribbon embroidery or crazy quilting.


Start with Needle and Floss

Bring the needle up through the fabric and wrap the thread around the needle. Bring the needle back down through the fabric where you want to place the petal.

Make Raised Rounds of Thread
Hope you have some fun with this embroidered rose.

Friday, February 11, 2011

Make a Fan Quilt Pattern -- Pillow, Throw or Quilt


 Make Your Own Fan Quilt Pattern for a Pillow, a Throw or a Quilt

A fan quilt is often called grandmother's fan, and the pattern is not difficult to make. It also has lots of uses, since you can use four fan squares to make a circle or two fan squares for half a circle. You can make a pillow or a lap quilt, or if you are ambitious, a full-size quilt. A 7-inch block is a good size for the fan quilt, and four of these will make a 14-inch pillow. Here is a grandmother's fan quilt block from the 1950s I received from my cousin in West Virginia. We worked on this quilt a couple of winters, and never finished it. I have made a few pillows from the blocks, and have some left to work. If you want to make a fan quilt pattern, I would suggest that you make fewer spokes in the fan, since seven is more spokes than you really need.

7 Spokes Require 13 degrees for Each One

You don't need any real knowledge, but you need a ruler and something that measures degrees. If you quilt, you probably already have that. You can whip out your own pattern in no time. Three sections require 30-degree spokes. I noticed a recent Fons and Porter's "Love of Quilting" magazine has 3-section fan blocks made into a quilt on the front cover. Five spokes require 18 degrees for each, and six spokes of the fan take 15- degrees.

Make some blocks, trim them straight and sew them in a circle or a semi-circle to make a colorful pillow or crafts project you can enjoy for years to come. This is excellent use of your time while the weather is cold, and you know you like to do sewing crafts. Quilting is one of my favorites and I love to share!  See you again soon!

Linda